社区精选 |视觉还原小技巧!CSS 实现角标效果
今天为各位小伙伴推荐的是社区作者 XboxYan 的文章,在这篇文章中他介绍了一些提升视觉还原的小技巧,让我们一起来学习吧!

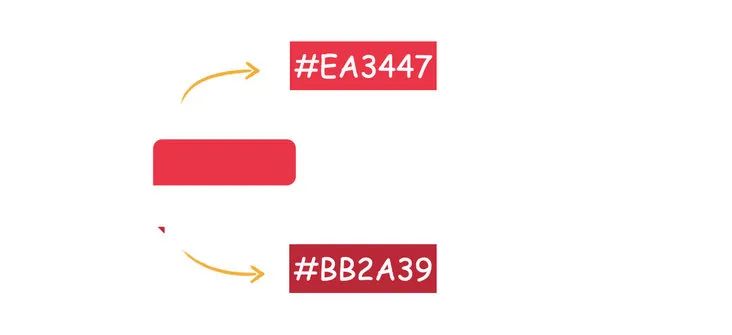
一、圆角矩形和三角形

<tag>审核为通过</tag>
tag{
  border-radius: 4px 4px 4px 0px;
  color: #fff;
  padding: 2px 6px;
  font-size: 10px;
  line-height: 16px;
  background: #EA3447;
}

tag::before{
    content: '';
    position: absolute;
    width: 3px;
    height: 3px;
    left: 0;
    bottom: -3px;
    background: #BB2A39;
    clip-path: polygon(0 0, 100% 0, 100% 100%); /*三角*/
}
二、颜色稍暗的三角形

1. 遮盖一层半透明的黑色

tag::before{
  background: linear-gradient(rgba(0, 0, 0, 0.3), rgba(0, 0, 0, 0.3));
  background-color: inherit;
}
2. 通过滤镜实现

tag::before{
  filter: brightness(.7);
  background-color: inherit;
}
3.未来的解决方式 color-mix
.el{
  background: darken(@color, 20%);
}
.el{
  --accent: #EA3447;
  background: hsl(from var(--accent) h s calc(l - 20%));
}
三、富有质感的高光

tag{
  background: linear-gradient(to right bottom, rgba(255, 255, 255, 0.4), transparent) rgba(20, 30, 41, 0.76));
}

tag{
  background-blend-mode: soft-light
}

tag{
  border-radius: 4px 4px 4px 0px;
  color: #fff;
  padding: 2px 6px;
  font-size: 10px;
  line-height: 16px;
  background: linear-gradient(to right bottom, rgba(255, 255, 255, 0.4), transparent) var(--bg, #EA3447);
  background-blend-mode: soft-light;
}
tag::before{
  content: '';
  position: absolute;
  width: 3px;
  height: 3px;
  left: 0;
  bottom: -3px;
  background-color: inherit;
  filter: brightness(.7);
  clip-path: polygon(0 0, 100% 0, 100% 100%);
}
四、总结一下
自适应尺寸的尽量用 CSS 实现 三角的实现推荐 clip-path,更容易理解 充分考虑实现的可维护性,比如能用一个变量,就不要用两个变量,CSS 同样如此 叠加一层半透明的黑色可以实现图像变暗 图像变暗还可以通过 CSS 滤镜 brightness 实现 未来还可以通过颜色混合 color-mix 来实现,可以提前了解一下 背景混合模式可以让颜色叠加根据自然
SegmentFault 思否社区小编说
自 2022-07-01 起 SegmentFault 思否公众号改版啦!之后将陆续推出新的栏目和大家见面!(请拭目以待呀~❤)
在「社区精选」栏目中,我们将为广大开发者推荐来自 SegmentFault 思否开发者社区的优质技术文章,这些文章全部出自社区中充满智慧的技术创作者哦!
希望通过这一栏目,大家可以共同学习技术干货,GET 新技能和各种花式技术小 Tips。
欢迎越来越多的开发者加入创作者的行列,我们将持续甄选出社区中优质的内容推介给更多人,让闪闪发光的技术创作者们走到聚光灯下,被更多人认识。
「社区精选」投稿邮箱:pr@segmentfault.com
投稿请附上社区文章地址


关注公众号:拾黑(shiheibook)了解更多
赞助链接:
关注数据与安全,洞悉企业级服务市场:https://www.ijiandao.com/
四季很好,只要有你,文娱排行榜:https://www.yaopaiming.com/
让资讯触达的更精准有趣:https://www.0xu.cn/
 关注网络尖刀微信公众号
随时掌握互联网精彩
- R星向黑客发感谢声明 去年共向他们支付仅1.7万美元
- 加币兑换人民币汇率2024年11月12日
- FlyonUI全新发布的TailwindCSS组件库
- 谷歌Chrome浏览器120稳定版发布 不再支持安卓 7.0!
- 这份财报,读出光伏业的欢喜与隐忧
- 全国低碳日 | 绿色低碳,运营商“先行”
- 国产软件崛起,本月值得关注的2款应用
- 【杂谈快报】vivo号召App开发者自查自纠 隐私不合规将进行下架、冻结等
- 大佬说:新版本收费+广告,又不好用,我自己写了个新的。
- 借呗欲推出“后悔药”,用7天冷静期拯救年轻人
- 【大公司创新情报】传理想汽车将推纯电动车型,官方:还没有确定的推出时间表
- 当小米Mi 6手机被刷入UOS系统?
赞助链接


 微信扫码关注公众号