Webpack 原理系列八:产物转译打包逻辑
作者:范文杰
来源:SegmentFault 思否社区
回顾一下,在之前的文章《有点难的 webpack 知识点:Dependency Graph 深度解析》已经聊到,经过 构建(make)阶段 后,Webpack 解析出:
module内容module与module之间的依赖关系图


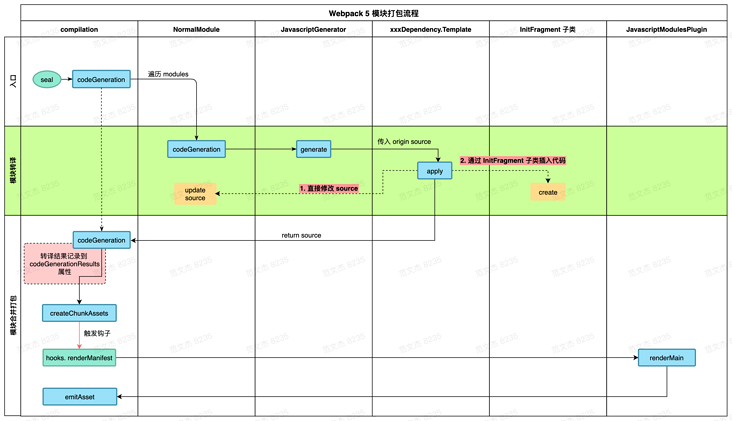
入口:指代从 Webpack 启动到调用 compilation.codeGeneration之前的所有前置操作模块转译:遍历 modules数组,完成所有模块的转译操作,并将结果存储到compilation.codeGenerationResults对象模块合并打包:在特定上下文框架下,组合业务模块、runtime 模块,合并打包成 bundle ,并调用 compilation.emitAsset输出产物
modules 逐一转译为模块产物 —— 模块转译,再将模块产物拼接成 bundle —— 模块合并打包,我们下面会按照这个逻辑分开讨论这两个过程的原理。一、模块转译原理
1.1 简介

index.js / name.js 两个业务文件组成,对应的 Webpack 配置如上图左下角所示;Webpack 构建产物如右边 main.js 文件所示,包含三块内容,从上到下分别为:name.js模块对应的转译产物,函数形态Webpack 按需注入的运行时代码
index.js模块对应的转译产物,IIFE(立即执行函数) 形态
name.js 、index.js 构建后的产物,可以看到产物与源码语义、功能均相同,但表现形式发生了较大变化,例如 index.js 编译前后的内容:
整个模块被包裹进 IIFE (立即执行函数)中
添加
__webpack_require__.r(__webpack_exports__);语句,用于适配 ESM 规范源码中的
import语句被转译为__webpack_require__函数调用源码
console语句所使用的name变量被转译为_name__WEBPACK_IMPORTED_MODULE_0__.default添加注释
1.2 核心流程
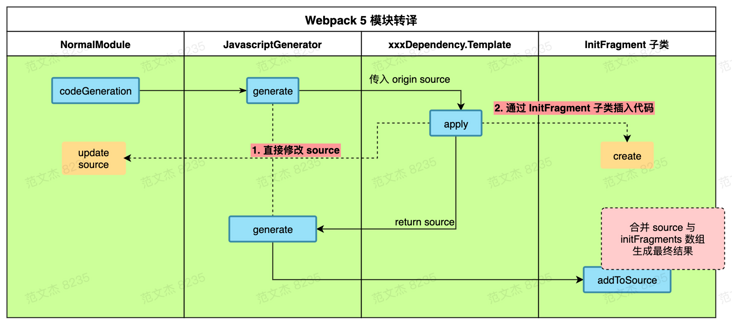
module.codeGeneration 调用开始,对应到上述流程图的:
调用 JavascriptGenerator 的对象的 generate 方法,方法内部:
遍历模块的 dependencies 与 presentationalDependencies 数组
执行每个数组项 dependeny 对象的对应的 template.apply 方法,在 apply 内修改模块代码,或更新 initFragments 数组
遍历完毕后,调用 InitFragment.addToSource 静态方法,将上一步操作产生的 source 对象与 initFragments 数组合并为模块产物
module 代码,最后再将所有变更合并为最终产物。这里面关键点:在
Template.apply函数中,如何更新模块代码在
InitFragment.addToSource静态方法中,如何将Template.apply所产生的 side effect 合并为最终产物
1.3 Template.apply 函数
JavascriptGenerator 类是毋庸置疑的C位角色,但它并不直接修改 module 的内容,而是绕了几层后委托交由 Template 类型实现。JavascriptGenerator.generate 函数会遍历模块的 dependencies 数组,调用依赖对象对应的 Template 子类 apply 方法更新模块内容,说起来有点绕,原始代码更饶,所以我将重要步骤抽取为如下伪代码:class JavascriptGenerator {
generate(module, generateContext) {
// 先取出 module 的原始代码内容
const source = new ReplaceSource(module.originalSource());
const { dependencies, presentationalDependencies } = module;
const initFragments = [];
for (const dependency of [...dependencies, ...presentationalDependencies]) {
// 找到 dependency 对应的 template
const template = generateContext.dependencyTemplates.get(dependency.constructor);
// 调用 template.apply,传入 source、initFragments
// 在 apply 函数可以直接修改 source 内容,或者更改 initFragments 数组,影响后续转译逻辑
template.apply(dependency, source, {initFragments})
}
// 遍历完毕后,调用 InitFragment.addToSource 合并 source 与 initFragments
return InitFragment.addToSource(source, initFragments, generateContext);
}
}
// Dependency 子类
class xxxDependency extends Dependency {}
// Dependency 子类对应的 Template 定义
const xxxDependency.Template = class xxxDependencyTemplate extends Template {
apply(dep, source, {initFragments}) {
// 1. 直接操作 source,更改模块代码
source.replace(dep.range[0], dep.range[1] - 1, 'some thing')
// 2. 通过添加 InitFragment 实例,补充代码
initFragments.push(new xxxInitFragment())
}
}
JavascriptGenerator.generate 函数的逻辑相对比较固化:初始化一系列变量
遍历
module对象的依赖数组,找到每个dependency对应的template对象,调用template.apply函数修改模块内容调用
InitFragment.addToSource方法,合并source与initFragments数组,生成最终结果
JavascriptGenerator.generate 函数并不操作 module 源码,它仅仅提供一个执行框架,真正处理模块内容转译的逻辑都在 xxxDependencyTemplate 对象的 apply 函数实现,如上例伪代码中 24-28行。Dependency 子类都会映射到一个唯一的 Template 子类,且通常这两个类都会写在同一个文件中,例如 ConstDependency 与 ConstDependencyTemplate;NullDependency 与 NullDependencyTemplate。Webpack 构建(make)阶段,会通过 Dependency 子类记录不同情况下模块之间的依赖关系;到生成(seal)阶段再通过 Template 子类修改 module 代码。Module、JavascriptGenerator、Dependency、Template 四个类形成如下交互关系:
Template 对象可以通过两种方法更新 module 的代码:直接操作
source对象,直接修改模块代码,该对象最初的内容等于模块的源码,经过多个Template.apply函数流转后逐渐被替换成新的代码形式操作
initFragments数组,在模块源码之外插入补充代码片段
InitFragment.addToSource 函数,合成最终结果,下面简单补充一些细节。1.3.1 使用 Source 更改代码
Source 是 Webpack 中编辑字符串的一套工具体系,提供了一系列字符串操作方法,包括:字符串合并、替换、插入等 模块代码缓存、sourcemap 映射、hash 计算等
Source 库编辑代码内容,包括上文介绍的 Template.apply 体系中,逻辑上,在启动模块代码生成流程时,Webpack 会先用模块原本的内容初始化 Source 对象,即:const source = new ReplaceSource(module.originalSource());
Dependency 子类按序、按需更改 source 内容,例如 ConstDependencyTemplate 中的核心代码:ConstDependency.Template = class ConstDependencyTemplate extends (
NullDependency.Template
) {
apply(dependency, source, templateContext) {
// ...
if (typeof dep.range === "number") {
source.insert(dep.range, dep.expression);
return;
}
source.replace(dep.range[0], dep.range[1] - 1, dep.expression);
}
};
ConstDependencyTemplate 中,apply 函数根据参数条件调用 source.insert 插入一段代码,或者调用 source.replace 替换一段代码。1.3.2 使用 InitFragment 更新代码
source 外,Template.apply 中还可以通过操作 initFragments 数组达成修改模块产物的效果。initFragments 数组项通常为 InitFragment 子类实例,它们通常带有两个函数: getContent、getEndContent,分别用于获取代码片段的头尾部分。HarmonyImportDependencyTemplate 的 apply 函数中:HarmonyImportDependency.Template = class HarmonyImportDependencyTemplate extends (
ModuleDependency.Template
) {
apply(dependency, source, templateContext) {
// ...
templateContext.initFragments.push(
new ConditionalInitFragment(
importStatement[0] + importStatement[1],
InitFragment.STAGE_HARMONY_IMPORTS,
dep.sourceOrder,
key,
runtimeCondition
)
);
//...
}
}
1.4 代码合并
Template.apply 处理完毕后,产生转译后的 source 对象与代码片段 initFragments 数组,接着就需要调用 InitFragment.addToSource 函数将两者合并为模块产物。addToSource 的核心代码如下:class InitFragment {
static addToSource(source, initFragments, generateContext) {
// 先排好顺序
const sortedFragments = initFragments
.map(extractFragmentIndex)
.sort(sortFragmentWithIndex);
// ...
const concatSource = new ConcatSource();
const endContents = [];
for (const fragment of sortedFragments) {
// 合并 fragment.getContent 取出的片段内容
concatSource.add(fragment.getContent(generateContext));
const endContent = fragment.getEndContent(generateContext);
if (endContent) {
endContents.push(endContent);
}
}
// 合并 source
concatSource.add(source);
// 合并 fragment.getEndContent 取出的片段内容
for (const content of endContents.reverse()) {
concatSource.add(content);
}
return concatSource;
}
}
addToSource 函数的逻辑:遍历
initFragments数组,按顺序合并fragment.getContent()的产物合并
source对象遍历
initFragments数组,按顺序合并fragment.getEndContent()的产物
initFragments 数组一层一层包裹住模块代码 source,而两者都在 Template.apply 层面维护。1.5 示例:自定义 banner 插件
Template.apply 转译与 InitFragment.addToSource 合并之后,模块就完成了从用户代码形态到产物形态的转变,为加深对上述 模块转译 流程的理解,接下来我们尝试开发一个 Banner 插件,实现在每个模块前自动插入一段字符串。Dependency、Template、hooks 对象,代码:const { Dependency, Template } = require("webpack");
class DemoDependency extends Dependency {
constructor() {
super();
}
}
DemoDependency.Template = class DemoDependencyTemplate extends Template {
apply(dependency, source) {
const today = new Date().toLocaleDateString();
source.insert(0, `/* Author: Tecvan */
/* Date: ${today} */
`);
}
};
module.exports = class DemoPlugin {
apply(compiler) {
compiler.hooks.thisCompilation.tap("DemoPlugin", (compilation) => {
// 调用 dependencyTemplates ,注册 Dependency 到 Template 的映射
compilation.dependencyTemplates.set(
DemoDependency,
new DemoDependency.Template()
);
compilation.hooks.succeedModule.tap("DemoPlugin", (module) => {
// 模块构建完毕后,插入 DemoDependency 对象
module.addDependency(new DemoDependency());
});
});
}
};
编写
DemoDependency与DemoDependencyTemplate类,其中DemoDependency仅做示例用,没有实际功能;DemoDependencyTemplate则在其apply中调用source.insert插入字符串,如示例代码第 10-14 行使用
compilation.dependencyTemplates注册DemoDependency与DemoDependencyTemplate的映射关系使用
thisCompilation钩子取得compilation对象使用
succeedModule钩子订阅module构建完毕事件,并调用module.addDependency方法添加DemoDependency依赖
module 对象的产物在生成过程就会调用到 DemoDependencyTemplate.apply 函数,插入我们定义好的字符串,效果如:
lib/dependencies/ConstDependency.js,一个简单示例,可学习
source的更多操作方法lib/dependencies/HarmonyExportSpecifierDependencyTemplate.js,一个简单示例,可学习
initFragments数组的更多用法lib/dependencies/HarmonyImportDependencyTemplate.js,一个较复杂但使用率极高的示例,可综合学习
source、initFragments数组的用法
二、模块合并打包原理
2.1 简介

compilation.codeGeneration 函数执行完毕 —— 也就是模块转译阶段完成后,模块的转译结果会一一保存到 compilation.codeGenerationResults 对象中,之后会启动一个新的执行流程 —— 模块合并打包。
(() => { // webpackBootstrap
    "use strict";
    var __webpack_modules__ = ({
        "module-a": ((__unused_webpack_module, __webpack_exports__, __webpack_require__) => {
            // ! module 代码,
        }),
        "module-b": ((__unused_webpack_module, __webpack_exports__, __webpack_require__) => {
            // ! module 代码,
        })
    });
    // The module cache
    var __webpack_module_cache__ = {};
    // The require function
    function __webpack_require__(moduleId) {
        // ! webpack CMD 实现
    }
    /************************************************************************/
    // ! 各种 runtime
    /************************************************************************/
    var __webpack_exports__ = {};
    // This entry need to be wrapped in an IIFE because it need to be isolated against other modules in the chunk.
    (() => {
        // ! entry 模块
    })();
})();
最外层由一个 IIFE 包裹
一个记录了除
entry外的其它模块代码的__webpack_modules__对象,对象的 key 为模块标志符;值为模块转译后的代码一个极度简化的 CMD 实现:
__webpack_require__函数最后,一个包裹了
entry代码的 IIFE 函数
module 转译为可以在宿主环境如浏览器上运行的代码形式;而 模块合并 操作则串联这些 modules ,使之整体符合开发预期,能够正常运行整个应用逻辑。接下来,我们揭晓这部分代码的生成原理。2.2 核心流程
compilation.codeGeneration 执行完毕,即所有用户代码模块与运行时模块都执行完转译操作后,seal 函数调用 compilation.createChunkAssets 函数,触发 renderManifest 钩子,JavascriptModulesPlugin 插件监听到这个钩子消息后开始组装 bundle,伪代码:// Webpack 5
// lib/Compilation.js
class Compilation {
seal() {
// 先把所有模块的代码都转译,准备好
this.codeGenerationResults = this.codeGeneration(this.modules);
// 1. 调用 createChunkAssets
this.createChunkAssets();
}
createChunkAssets() {
// 遍历 chunks ,为每个 chunk 执行 render 操作
for (const chunk of this.chunks) {
// 2. 触发 renderManifest 钩子
const res = this.hooks.renderManifest.call([], {
chunk,
codeGenerationResults: this.codeGenerationResults,
...others,
});
// 提交组装结果
this.emitAsset(res.render(), ...others);
}
}
}
// lib/javascript/JavascriptModulesPlugin.js
class JavascriptModulesPlugin {
apply() {
compiler.hooks.compilation.tap("JavascriptModulesPlugin", (compilation) => {
compilation.hooks.renderManifest.tap("JavascriptModulesPlugin", (result, options) => {
// JavascriptModulesPlugin 插件中通过 renderManifest 钩子返回组装函数 render
const render = () =>
// render 内部根据 chunk 内容,选择使用模板 `renderMain` 或 `renderChunk`
// 3. 监听钩子,返回打包函数
this.renderMain(options);
result.push({ render /* arguments */ });
return result;
}
);
});
}
renderMain() {/* */}
renderChunk() {/* */}
}
compilation 以 renderManifest 钩子方式对外发布 bundle 打包需求; JavascriptModulesPlugin 监听这个钩子,按照 chunk 的内容特性,调用不同的打包函数。MainTemplate 完成。JavascriptModulesPlugin 内置的打包函数有:renderMain:打包主 chunk 时使用renderChunk:打包子 chunk ,如异步模块 chunk 时使用
renderMain 的实现。2.3 renderMain 函数
renderMain 函数涉及比较多场景判断,原始代码很长很绕,我摘了几个重点步骤:class JavascriptModulesPlugin {
renderMain(renderContext, hooks, compilation) {
const { chunk, chunkGraph, runtimeTemplate } = renderContext;
const source = new ConcatSource();
// ...
// 1. 先计算出 bundle CMD 核心代码,包含:
// - "var __webpack_module_cache__ = {};" 语句
// - "__webpack_require__" 函数
const bootstrap = this.renderBootstrap(renderContext, hooks);
// 2. 计算出当前 chunk 下,除 entry 外其它模块的代码
const chunkModules = Template.renderChunkModules(
renderContext,
inlinedModules
? allModules.filter((m) => !inlinedModules.has(m))
: allModules,
(module) =>
this.renderModule(
module,
renderContext,
hooks,
allStrict ? "strict" : true
),
prefix
);
// 3. 计算出运行时模块代码
const runtimeModules =
renderContext.chunkGraph.getChunkRuntimeModulesInOrder(chunk);
// 4. 重点来了,开始拼接 bundle
// 4.1 首先,合并核心 CMD 实现,即上述 bootstrap 代码
const beforeStartup = Template.asString(bootstrap.beforeStartup) + "\n";
source.add(
new PrefixSource(
prefix,
useSourceMap
? new OriginalSource(beforeStartup, "webpack/before-startup")
: new RawSource(beforeStartup)
)
);
// 4.2 合并 runtime 模块代码
if (runtimeModules.length > 0) {
for (const module of runtimeModules) {
compilation.codeGeneratedModules.add(module);
}
}
// 4.3 合并除 entry 外其它模块代码
for (const m of chunkModules) {
const renderedModule = this.renderModule(m, renderContext, hooks, false);
source.add(renderedModule)
}
// 4.4 合并 entry 模块代码
if (
hasEntryModules &&
runtimeRequirements.has(RuntimeGlobals.returnExportsFromRuntime)
) {
source.add(`${prefix}return __webpack_exports__;\n`);
}
return source;
}
}
先计算出 bundle CMD 代码,即
__webpack_require__函数计算出当前 chunk 下,除 entry 外其它模块代码
chunkModules计算出运行时模块代码
开始执行合并操作,子步骤有:
合并 CMD 代码
合并 runtime 模块代码
遍历
chunkModules变量,合并除 entry 外其它模块代码合并 entry 模块代码
返回结果
compilation.emitAsset ,按上下文环境将产物输出到 fs 即可,Webpack 单次编译打包过程就结束了。三、总结
首先遍历 chunk 中的所有模块,为每个模块执行转译操作,产出模块级别的产物
根据 chunk 的类型,选择不同结构框架,按序逐次组装模块产物,打包成最终 bundle
在《[万字总结] 一文吃透 Webpack 核心原理》中高度概括的讨论了 Webpack 从前到后的工作流程,帮助读者对 Webpack 的实现原理有一个较抽象的认知;
在《[源码解读] Webpack 插件架构深度讲解》详细介绍了 Webpack 插件机制的实现原理,帮助读者深入理解 Webpack 架构与钩子的设计;
在《有点难的 webpack 知识点:Dependency Graph 深度解析》详细介绍了语焉不详的 模块依赖图 概念,帮助读者理解 Webpack 中依赖发现与依赖关系构建过程
在《有点难的知识点:Webpack Chunk 分包规则详解》详细介绍了 chunk 分包的基本逻辑与实现方法,帮助读者理解产物分片的原理
在《Webpack 原理系列六:彻底理解 Webpack 运行时》详细介绍了 bundle 中,除业务模块外其它运行时代码的由来与作用,帮助读者理解产物的运行逻辑
最后,再到本文介绍的模块转译与合并打包逻辑


关注公众号:拾黑(shiheibook)了解更多
赞助链接:
关注数据与安全,洞悉企业级服务市场:https://www.ijiandao.com/
四季很好,只要有你,文娱排行榜:https://www.yaopaiming.com/
让资讯触达的更精准有趣:https://www.0xu.cn/
 关注网络尖刀微信公众号
随时掌握互联网精彩
- 拥有200万+用户的Telegram消息转发机器人@livegrambot未经用户同意发送广告
- 研究人员在苹果查找网络中发现漏洞 借助漏洞可追踪其他蓝牙设备
- 顶级WordPress缓存插件W3 Total Cache存在高危漏洞 请立即升级
- 手机业该如何面对增长平台期?
- 中关村水木医疗完成亿元级A+轮融资,打造医疗器械全产业链一站式服务平台
- 电子纸B端应用更流行,华为苹果缘何忙?
- 运营商4月成绩单:中国电信5G用户增速第一 渗透率高达57%
- 沈南鹏问了微软CEO四个问题
- 有 100 个解决问题的方式,我只偏爱这一个。
- 闻库:做好数字中国光网底座是光通信产业的使命和责任
- 掌上游戏机还有前途吗?
- 龙芯电脑使用解析,统信UOS版


 微信扫码关注公众号